A Little History
In 1877, Thomas Edison became the first person to snatch sound waves out of the air and engrave them onto tinfoil cylinders that could be read by a needle and played out loud.
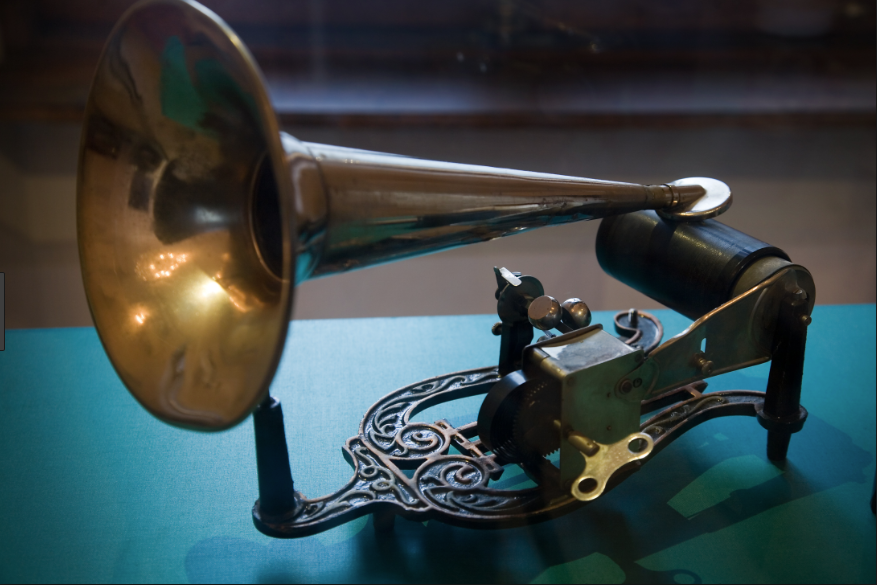
Edison’s invention that started it all. (© Jorge Royan / http://www.royan.com.ar / CC BY-SA 3.0)
The next evolution in music playback took a more familiar form: a flat acetate record that spun at 78 rpm. While easier to mass produce than Edison’s cylinders, these records had an annoying habit of shattering if not coddled like a baby.
Getting Music Onto Vinyl
It all starts in a studio, where musicians work with engineers to record and mix their album. The resulting audio is then sent off for mastering, which is the process of preparing the album for reproduction.
Mastering for vinyl requires special knowledge of the format and a skilled ear. When a vinyl record is properly mastered, its warmth and depth will immediately distinguish it from its digital counterpart. A badly mastered record, on the other hand, can cause a turntable’s stylus to track poorly in the record’s grooves, causing unwanted distortion. It can even skip if the sonic errors are too egregious.
Like digital formats, vinyl can reproduce the entire audible frequency spectrum—but how vinyl achieves this is quite different than the way it works in the digital domain. This is because a record needle has to physically track the sound waves that are inscribed in the grooves. The lower the frequency (think bass), the wider the groove. If the sound were transferred directly to the groove unaltered, the grooves would have to be extremely wide to accommodate all the bass content, shortening the record’s side and possibly making it unplayable.
So long ago a clever system was devised: the RIAA equalization curve.
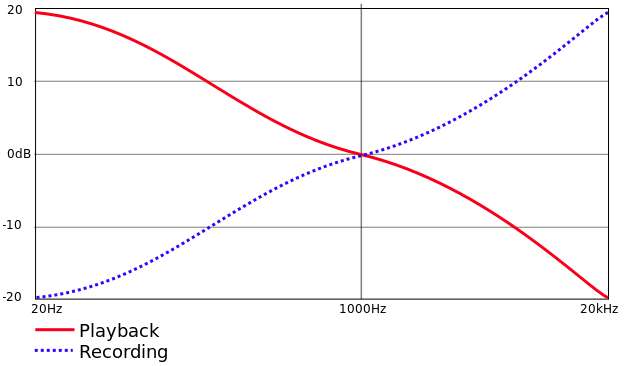
The idea was to reduce the bass and boost the treble content in the record groove. When you play the record, your phono preamp applies the opposite equalization, restoring the natural sound balance. This is just one of the unique techniques employed by an engineer mastering for vinyl. For example, the bass generally must be centered in the stereo mix and there are special requirements for levels, dynamics, and compression.
Once the music has been properly equalized and optimized for vinyl, it’s ready to be “cut,” the first tangible step in the record-making process. Doing this requires a studio with the proper tools for analog mastering. The main piece of equipment is called a cutting lathe, the machine that physically carves the music’s grooves into a plate called a lacquer—an aluminum plate covered with cellulose nitrate, a coating similar to nail polish.
In the cutting studio, the mastering engineer places a blank lacquer onto the lathe and the machine transforms the auditory energy of the recording into the physical movement of a needle on the lacquer. In this sense, the lathe is the opposite of a turntable, turning sound into movement instead of movement into sound. Tipped with a helium-cooled sapphire cutting head, the lathe’s needle carves the music in a single, unbroken spiral looping into the middle of the platter. At the end of this mastering process the lacquer looks a great deal like a finished record.
Learn more about preparing your audio for vinyl.
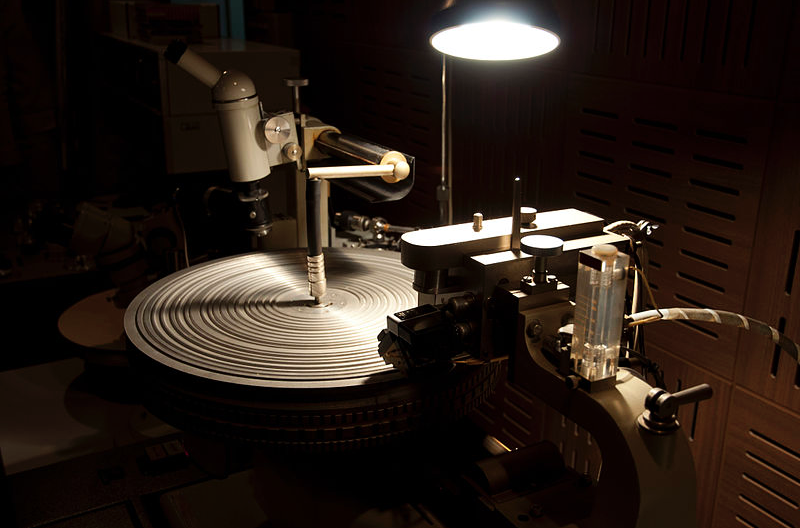 A lacquer on a cutting lathe. (© JacoTen / https://creativecommons.org/licenses/by-sa/3.0 / CC BY-SA 3.0)
Fathers, Mothers And Heavy Metal
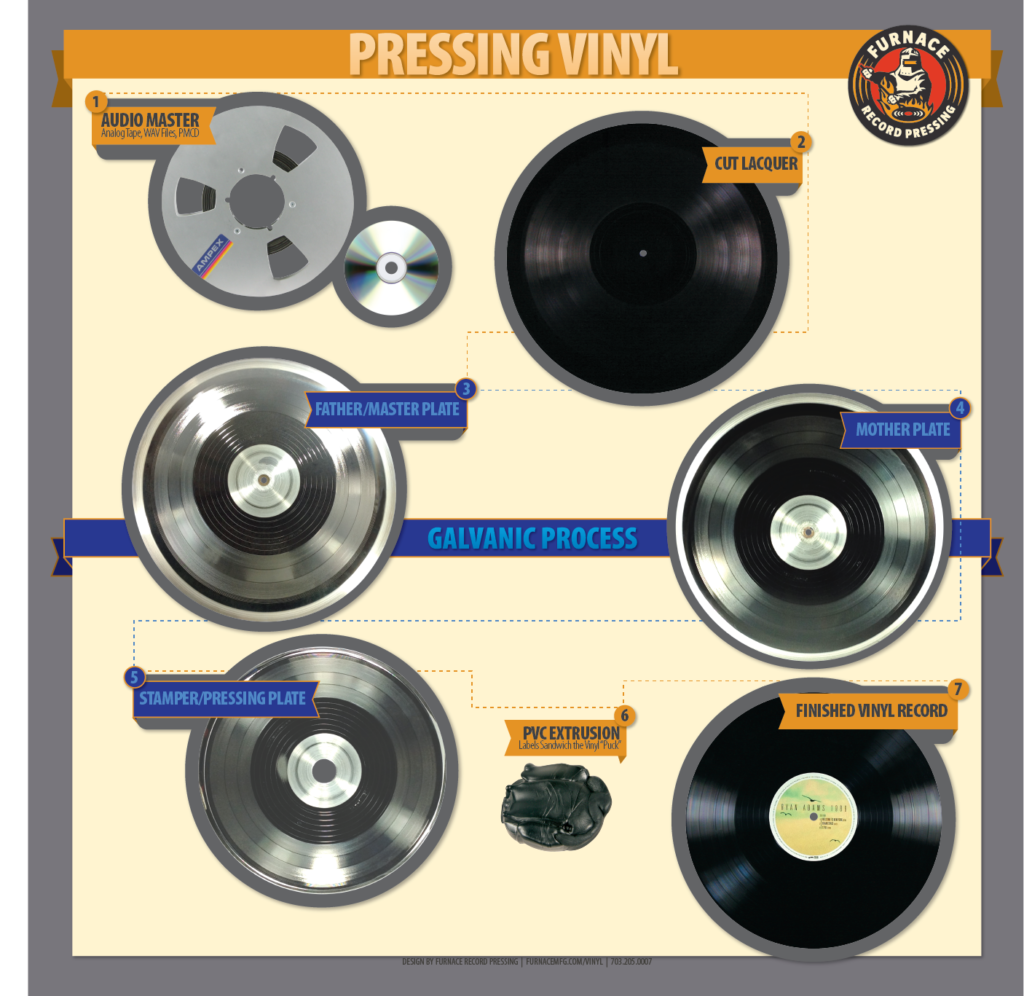
After the lacquer is cut it’s ready for the plating process, a method of creating a nickel-coated copy that is ultimately used to stamp out hundreds of duplicate records in vinyl.
First, the lacquer is put into a series of baths to gently neutralize any dust or oil that may be on its surface. Then, using a spray gun, the lacquer is spritzed with a fine mist of silver until one side is evenly coated. At this point, the electroforming process can begin. This process uses an electric current to slowly form a nickel plate on top of the lacquer. First, the silvered lacquer is lowered into a bath of chemicals mixed with nuggets of nickel. An electric current introduced to the solution activates the bath and attracts individual nickel molecules to the electrically conductive, silvered lacquer. Over time, as the nickel bonds to the silver, a nickel plate grows on top of the lacquer to create a negative plate called a “master” or “father” plate. While the father could be used to press records, best practices call for it to be saved as a backup master, as plates wear out during the pressing process.
Carefully separating the father plate during the galvanic process
The father is therefore separated from the lacquer and a positive nickel cast is made from this platter. To do this, the father is returned to the electroforming bath and a second nickel plate is grown on to it. The resulting positive cast is called the “mother.” Before continuing with the plating process, the mother is played aloud to check that it is free of defects and that its audio meets the highest quality standards. The mother is a positive cast of the original lacquer (that’s why you can play it on a turntable), so you can’t use it to press records. The plate is returned to the electroforming bath and plated to create the final piece of this puzzle, a negative plate referred to as a “stamper.” As its name implies, this is the thing that will actually stamp your record. The entire process is completed for each side of a record.
The Stamper Three-Step
The above method of creating a stamper is referred to as a three-step plating process. Alternatively, manufacturers can use a two-step process, where the father, the first nickel plate created, is used as the stamper. The three-step process outlined above, however, is industry best practice, as it reserves the father plate as a backup in the likely case that the mother degrades while making stampers.
A mother plate can only be used to produce a limited number of stampers. Once the mother is too worn, the backup father plate is used to make more mothers, which in turn make more stampers. A two-step plating process cuts corners, leaving manufacturers without an easy way to create additional mothers. That means when the mother wears out or is damaged, a new lacquer must be cut and the plating and electroforming processes must start from scratch, an expensive and unnecessary delay.
Each stamper can produce between 500 and 1000 records before degrading, so a number of stampers are made at this stage, depending on the size of the pressing run. Once the stampers are ready, their backs are sanded down to eliminate surface anomalies, since any accidental microscopic bump or ridge on the back of the stamper will be transferred onto the finished record when it’s pressed. Additionally, sanding ensures that each stamper is the exact same thickness as its B-side companion.
The sanded stamper is then loaded into a center punch machine that uses a microscope to align its grooves and punch a spindle hole in its exact center. Lastly, the stamper is put onto a forming press, a machine that fashions the flat plate into a shape the pressing machine can hold during the actual pressing process. Sanded, centered and shaped, the stamper is ready to enter the vinyl record press.
But Wait, There’s More
Before the retail copies of the record are pressed, the plant produces a handful of test pressings. These first few records are made for quality control purposes, and they’re sent to the musicians to be inspected and approved. Prior to the test pressings being put in the mail, the plant conducts quality control with a meticulous visual inspection of the record’s grooves, along with a sound check made by playing the record aloud.
More work occurs while the pressing plant is waiting for the customers to approve their test pressings. Graphic designers get busy creating and formatting artwork specifically for vinyl packaging. Once designed, the record jackets, center labels and inserts head to the printer. Record inserts may include liner notes, lyric sheets, posters, digital download cards, or whatever else the customer has dreamed up. Download cards are a process in and of themselves. They entail hosting audio files online so consumers can download a digital version of the vinyl album they purchased. Once the center labels have been printed and the test presses approved, the entire batch of records is ready to be manufactured. The presses, finally, begin their real work.
Waffles And Biscuits
Imagine a hydraulically operated, one-and-a-half-ton waffle iron heated with 300-degree steam. That’s the basic idea behind a vinyl record press.
Small pellets of PVC (about the size of lentils) travel through an extruder, are melted, and then oozed into the shape of a hockey puck. This gooey cake of molten vinyl is called a biscuit. A biscuit can be made from classic black vinyl or it can feature a variety of colors and effects.
The record’s labels are baked beforehand until every drop of residual moisture is extracted from the paper—a step necessary to avoid cracks and bubbles during pressing. Just before pressing, these labels are placed on either side of the biscuit. The labels and the extruded vinyl puck are slid into the open record press and in between the two dies, the part of the pressing machine that holds the pair of stampers above and below the biscuit.
The machine closes and steam is pumped into the die as the biscuit is squeezed between the stampers with one-and-a-half tons of force. Though the steam is pre-heated to 300°F, the extreme pressure generated by the press further heats the steam to around 960°F.
You may think this immense force alone stamps the grooves of music onto the vinyl. Rather, it’s the steam cycle that’s routed into the die that ultimately melts the plastic so it flows into the stamper’s microgrooves, precisely transferring them to the vinyl surface.
The steam then exits the die and cold water takes its place, quickly hardening the newly minted record. The press opens, the record is removed, and its excess edges are trimmed off, forming the record into a perfect circle of vinyl. Approximately 30 seconds after it began, the pressing process is complete.
Pressing a biscuit into a flat record and trimming the edges
While the machines are pressing the vinyl, every fiftieth record or so is taken off the press, put onto a turntable, and played aloud for quality control inspectors to ensure that its sound matches that of the approved test pressings. Any degradation in sound quality is an indication that it’s time for a stamper to be replaced. Records that don’t meet the manufacturer’s high standards are recycled, ground back into pellets of PVC to be melted down and made into future records. The completed records are then stacked and left to cool for up to 24 hours. A weighted aluminum plate is placed between every few records to ensure they remain flat as they cure.
Out The Door And Onto A Turntable
Each approved record is slipped inside a protective sleeve and sent to the packaging assembly line. It’s here that the record jackets are filled with vinyl along with any inserts. Each assembled jacket is then encased in either shrink-wrap or a plastic poly sleeve to protect the jacket from the scuffs and dings that can occur during shipping or while a record awaits purchase in a retail bin.
At this stage, many customers choose to apply a custom marketing sticker to the plastic covering to better attract attention to their record. Lastly, the completed records are packed into cardboard boxes, which are stacked onto a shipping pallet, wrapped in plastic and secured snugly together with straps. This shipping method is the safest way to ensure that the record order arrives on the customer’s doorstep unbroken, undented and unscratched.
From here, the records find their way to stores—and ultimately to consumers’ turntables, where they can be played and enjoyed for years to come.
The modern day LP was introduced in the late 1940s. Made from PVC (polyvinyl chloride), these vinyl records had much less surface noise and were more durable than their shellac predecessors. Over the years, vinyl formulations have been continuously improved, resulting in today’s nearly silent, ultra-high resolution discs.