Releasing an album on vinyl has become nearly essential for many bands these days. But it’s not just a matter of cutting your digital files straight to an LP. From a technical standpoint, all digital music is the same – a string of ones and zeros. Vinyl is a different beast, with some limitations that are inherent to the medium. Mastering your music for vinyl involves preparing the audio to avoid potential pitfalls, while maximizing what an analog LP does best – creating warm, natural, and realistic sounding music.
The Basics
A vinyl record is a plastic plate containing a single continuous groove that produces sound when tracked by a turntable needle. Every sound wave in your music – every vocal note and every drum hit – is represented by a microscopic squiggle inside the record’s groove.
To accurately track and reproduce all those complex sounds is an astonishingly difficult physical feat. By the 1950s audio engineers had developed some clever tricks and workarounds to make this process a little easier, thereby delivering the full audible range of sound while maximizing the time per record side – hence the term LP, which stands for long-play. Those same processes developed more than half a century ago have become the industry standard for producing great-sounding records.
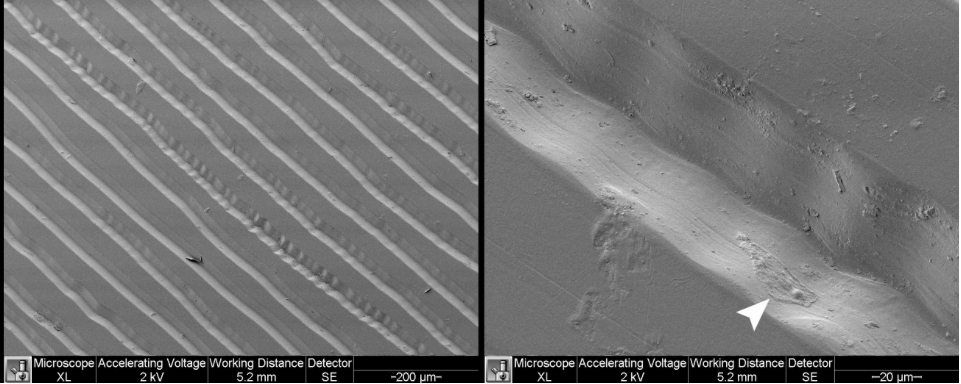
Microscopic close up of record grooves by Tbraunstein, licensed under CC BY-SA 3.0, from Wikimedia Commons
Deep Dive Into the Groove
The range of audible sound goes from a low frequency of 20Hz up to about 20,000Hz (or 20kHz. Since vinyl has a frequency response from 7Hz to 50kHz and beyond, along with more than 75dB of dynamic range, you can be sure that your music will be accurately reproduced on your LP.
That said, the physical limitations of the vinyl medium must be taken into consideration – the first of which is time. There’s only so much space on a record’s surface. Bass frequencies and volume level are two things that can eat up valuable vinyl real estate. That’s because a record groove is a literal recreation – an analog – of a sound wave carved into vinyl. Louder sounds are cut deeper, causing their grooves to become simultaneously wider as well.
Wider grooves need more room on a record. The lower the frequency of a sound, like that killer bass track, the farther out the groove swings from side to side. The farther a groove swings out, the more space it requires in order to avoid crashing into the adjacent grooves. Ultimately, the more space the grooves occupy, the shorter the record.
Physical space isn’t vinyl’s only limitation. A turntable’s stylus has to be able to accurately track within the groove. While it’s relatively easy for a stylus to follow the gentle, sweeping curve of bass frequencies, higher frequencies are translated into smaller, tighter curves.
Think of a highway running through gently rolling hills – cruising along at high speeds is easy. Now imagine trying to maintain that speed on a tightly winding mountain road. Even the best driver would lose control. With vinyl, the groove is the road and the turntable stylus is the car trying to navigate complex and rapidly changing terrain. Fortunately, there are a variety of ways to make that journey a smooth one – and to avoid driving off a cliff.
Don’t Skip these Steps
As noted before, vinyl can reproduce sounds well beyond human hearing. Combine the very sharp curves of high frequencies with deep bass and loud volume levels, however, and even the best stylus won’t be able to track the music. When that happens, distortion and even skipping can result, as the stylus will jump right out of the groove.
All of these things – the level of the song, the low bass of a kick drum, the highs from crashing cymbals – are happening at once, with different frequencies superimposed on top of each other in the groove walls. Below we’ll cover the main things to look out for when mixing your music for vinyl.
All About the Bass
Vinyl can reproduce incredibly deep, powerful bass. However, in this case there can be too much of a good thing. Extremely low frequencies (anything below 40 Hz) can force a turntable’s needle to swing so far to the side that it runs into a neighboring groove. This issue can be tackled by making sure the low end of your mix is controlled and tight. If your mix is shaking the doors of your car, it’s not going to play well with vinyl. Finally, make sure bass heavy sound sources are centered in your mix.
In addition to very low frequencies, there are two other things to consider for your vinyl record: stereo and out-of-phase information. Stereo bass content requires a great deal of vertical movement in the stylus, as the groove rapidly changes in depth. This radical groove geometry can easily cause skips. To solve this issue, you should center all low-end frequencies below 100 Hz and refrain from hard-panning bass information.
Out-of-phase material creates a different kind of problem: cancellation of frequencies that the cutting head can’t inscribe into the master lacquer. You may think that you’re bulking up your sound when you knock your kick drums out of alignment by a few milliseconds. In reality this out-of-phase material, especially on the low end, pulls the cutting head in two directions at once, collapsing the cut. You lose your groove and create a skip. To avoid this issue entirely, keep everything under 300 Hz in phase.
Taming the Treble
Extreme high frequencies, like extreme lows, come with their own unique set of challenges. Audio information above 20 kHz can overheat the cutting head, leading to noise and distortion on your record. Instruments such as hi-hats, tambourines and cymbals are especially problematic. As a preventative measure, don’t mix percussive sounds too loudly when preparing your album. Be mindful of how instruments with lots of high-end information are placed in your mix. Pay specific attention to the harshness in drum overheads, percussion, and the high-end of distorted guitars, among other instruments.
In addition to percussion, vocal sibilance can also result in distortion if not handled properly. Sibilance is the percussive sound a singer makes when they emphasize certain letters like “s,” “f” and “t.” Applying a de-esser can remove any offending sibilance from your vocals while keeping the rest of your high frequency information intact. A de-esser works like a narrow band dynamic equalizer, targeting only those frequencies in the range of sibilance – approximately 6 to 12 kHz.
De-essing should be handled during mixing, for if your album reaches the mastering stage without properly addressing sibilance, the only way to reduce these sounds is to apply a de-esser to your entire mix, which can have negative effects on other components of the song. Though a de-esser will remove sibilance from your tracks, it will not remove only sibilance. This dynamic equalizer does not target “ess” sounds themselves, but sounds that exist within the range of frequencies where sibilance is found, meaning that with a de-esser you take the chance of cutting out desirable sounds as well as sibilance.
While mastering engineers are capable of removing sibilance after a record has been mixed, doing so is a bit like conducting surgery; it’s possible to accomplish, but you risk damaging the other parts of your music that sit next to sibilance on the frequency spectrum. This one-size-fits-all solution is hardly desirable, but will be necessary to protect your album from the harsh and crispy sounds of untouched sibilance. Unfortunately, you’ll also end up with a record that’s both quieter and more prone to surface noise.
Sibilance is especially problematic on vinyl, as opposed to digital, as it’s a side effect of one of the clever fixes those 1950’s engineers came up with to create the modern LP. Because bass information takes up so much space and surface noise is such a potential problem with vinyl, these engineers developed something called the Recording Industry Association of America (RIAA) curve. This is a standard equalization scheme that’s applied before the master lacquer is cut.
Essentially, the RIAA curve reduces bass content and boosts treble when cutting the record. Without this curve, the low frequencies would take up so much space that you’d be left with only a five-minute side on a 12-inch – hardly an LP. In addition, boosting the treble at this stage dramatically lowers the high-frequency surface noise that even the quietest vinyl would otherwise produce.
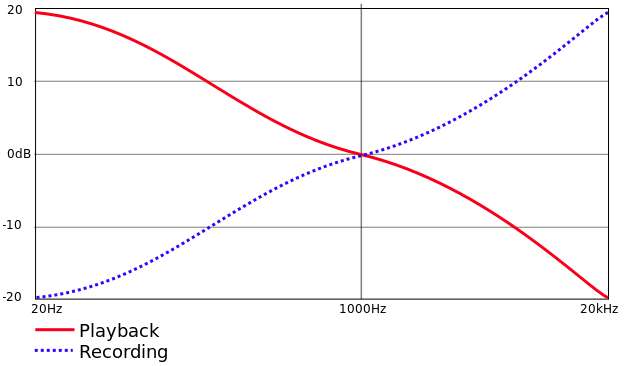
RIAA Curve – By Iainf 20:13, 27 July 2006 (UTC) [Public domain], from Wikimedia Commons
Here’s how the RIAA curve works. Starting at 1 kHz, bass gets rolled off by 6 dB per octave. By the time you reach the incredibly low 20 Hz, the level has been lowered by 20 dB. Additionally, the curve boosts all frequencies above 1 kHz, increasing the level by 20 dB at 20 kHz. Top to bottom, this is an overall difference of 40 dB.
By reducing the volume of bass information and making the treble louder, the RIAA curve creates more space for music on your record, with the added benefit of greatly reducing surface noise. You don’t have to worry about this part, as the RIAA curve is automatically applied to your music before a master is cut. This is also why a turntable requires a special phono preamp – in addition to amplifying the tiny voltage created by the turntable’s cartridge, the preamp applies the inverse of the RIAA curve, perfectly restoring the music’s natural balance.
Turn that Thing Down
As we touched on before, you must pay careful attention to volume when preparing your album for vinyl. Avoid using brickwall limiters or finalizers in your mix. While limiting does increase the average level of a digital track, it can ironically cause your vinyl album to be cut at a quieter volume to keep it from being overrun with distortion. Additionally, it’s critical that you leave headroom in your tracks before sending them to be mastered. By peaking your levels between -3 and -6 dBs, you leave space for your mastering engineer to create a clean, dynamic, undistorted cut.
Also remember that while the overall volume of your album can be adjusted in the mastering stage, individual instruments and vocals are nearly impossible to isolate in the mix. This fact backs mastering engineers into a corner, forcing them to change the level of your entire song to combat problems with extremely low bass or harsh sibilance. By creating a mix specifically for your vinyl release, using the above tips and tricks, you won’t have to compromise volume in order to avoid distortion.
Going the Distance
Beyond the specific changes that must be made to ultra-low and high frequencies, your vinyl release has a few other important considerations involving speed, distance and time.
A record spins at a fixed rpm, regardless of which part of the record the needle is reading. Since the groove continuously spirals inward, that means that on a 12” record, the length of a groove revolution near the label is considerably less – about half as long, in fact – than the groove length at the beginning of the record. This means that while two seconds of music travels about 36 inches around the outside of a record, that same two seconds is jammed onto 14.9 inches of vinyl near the label when the record is spinning at a standard 33 1/3 RPM.
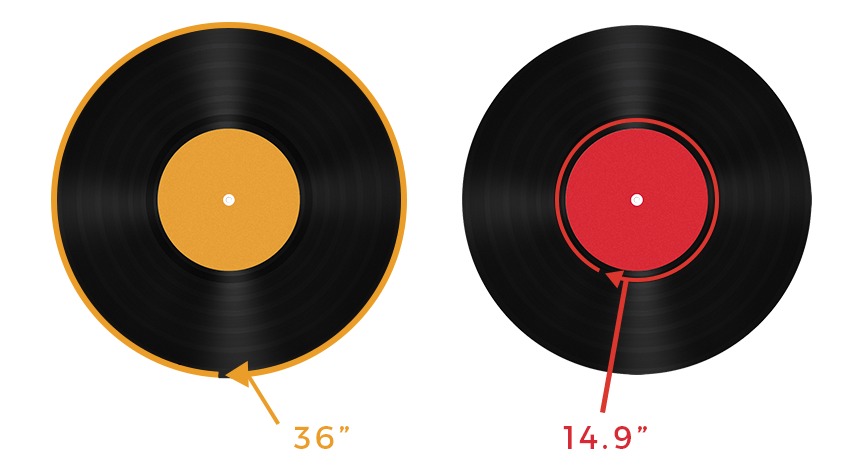
Groove distances
As audio information is pressed closer and closer to a record’s center hole, the side to side swings of the grooves are forced closer together as well, dramatically affecting a stylus’ ability to track this information. Consequently, an album begins to lose some high-end frequencies about halfway through an LP.
One good way to compensate for this degradation in quality is with the strategic ordering of your songs. You can maximize sound quality by placing your hottest, most dynamic tracks at the beginning of the album. Conversely, a soft, gentle ballad will survive the danger zone around the label much better than a loud, banging dance wrecker.
Another aspect of time involves the length of your album sides. The shorter the side of a record, the more space there is for grooves, meaning that a mastering engineer can cut sounds louder and with more dynamics without worrying about groove collisions. Alternatively, the longer a record is, the quieter it will need to be in order to allow space for every song.
As if having a lower overall level weren’t bad enough, the quieter a record gets, the more susceptible it becomes to surface noise. In other words, when it comes to vinyl, the shorter the better. As a rule, vinyl record lengths should be kept within the following times.
| Format | Speed (RPM) | Optimum Timing | Maximum Timing* |
|---|---|---|---|
| 12" | 45 | 9 minutes | 12 - 15 minutes |
| 12" | 33 1/3 | 12 - 14 minutes | 22 -24 minutes |
| 12" (DJ Levels) | 45 | 7 minutes | 9 minutes |
| 12" (DJ Levels) | 33 1/3 | 9 minutes | 12 minutes |
| 10" | 45 | 7 minutes | 11 minutes |
| 10" | 33 1/3 | 9 minutes | 14 minutes |
| 7" | 45 | 3 minutes | 6 minutes |
| 7" | 33 1/3 | 5 minutes | 9 minutes |
It’s also critical to balance your side times. Ideally, record sides should be kept within one minute of each other. If an imbalance is unavoidable, put your softer material on the longer side. This placement will help to ensure even levels across both sides.
In the pre-digital era, when all albums were recorded primarily for vinyl release, albums tended to run about 40 minutes or less. Since digital mediums are much less limited, today’s albums tend to run longer – sometimes much longer. But don’t despair. There are still some things you can do, though some solutions are more popular than others.
First, consider shortening songs by fading out mixes earlier than they finish on the CD version of the track. Alternatively, do some creative editing to cut out sections of a song that may be repetitive. You can even think about removing a song or two. Though this is a tough decision to make, soften the blow by including songs that are missing from a vinyl release via a digital download code inserted in the record jacket.
Lowering the average levels of songs, sides, or even the whole album can also create space for more and better-sounding grooves. If you’ve shortened songs and lowered levels and your album still runs longer than 40 minutes, consider releasing a double LP. Though pressing four sides of vinyl instead of two can dramatically increase your cost, it’s the best way to maintain both the quantity and quality of a longer album. Additionally, manufacturing your album as a double LP may create enough space for your record to spin at 45 RPM, rather than the standard 33 1/3 RPM, thereby further increasing the quality of your sound.
Digital to Analog? Sounds Great
Some people are concerned that pressing a vinyl record from a digital master defeats the whole purpose of an LP and the analog listening experience it delivers. There are a couple of reasons not to worry. One is that the very act of a stylus tracking an analog groove on your record is responsible for a lot of vinyl’s warm, lifelike sound. Additionally, the unique mixing and pre-mastering process that goes into creating a master that is suitable for vinyl inherently changes the quality of your music, regardless of whether that master originates from a high-res WAV file or from analog reel-to-reel.
If the music is mixed and mastered properly by an experienced engineer, vinyl will almost always sound different from its digital counterpart. Today, given the resolution possible with high sample rate and bit depth, it’s not only reasonable for a vinyl master to be cut from a digital file, it’s actually how most vinyl masters are created. Besides, recording to analog tape is an expensive proposition that most musicians can’t afford and many studios don’t offer.
While there persists a romantic view of analog masters, as long as digital masters are at least 96 kHz/24bit, there will be very little sacrifice of audio quality on the final record. That being said, having a higher bit depth, meaning having more bits of information in each sample, is more important than the sampling rate, or the rate of capture and playback in kHz. For example, a 44kHz/24bit digital master will sound better than a 96kHz/16bit master. Ultimately, however, the actual quality of pressed vinyl depends much more on the knowledge of the mixer, the skills of the cutter and the care of the pressing manufacturer than on the format of the master itself.
Sweating the Details
Once an album has been properly mixed and pre-mastered, it’s ready for the cutting studio where an engineer will create a lacquer of your record. At this point it’s crucial that the proper paperwork and information accompany your mix to avoid unnecessary delays in your pressing schedule.
Your mastering engineer will need a complete track list including the names of all songs (don’t forget to include hidden or bonus songs), track timings, the total time of each side and the split point between side A and side B. Double check that this information matches what’s listed on the record label and cover art. The pauses between songs in your mix must be exactly how long you want them to appear on your pressed record. Altogether, this information will help your mastering engineer gauge how far apart the grooves on your record must be to ensure the highest audio levels and greatest quality possible.
Finally, always make sure that your vinyl record pressing plant is ready to receive your lacquers. A master lacquer is delicate by design since it’s soft enough to be cut into easily by the lathe’s cutting head. That means lacquers can begin to degrade within a matter of days, even if they’re sitting untouched in a shipping box. For this reason, cutting should not begin until your plant is equipped with your shipping and ID information and is ready to start to work with your lacquers the minute they enter the factory.
As you can see, there’s a lot of information to take in when thinking about releasing your album on vinyl. What works for a CD or a digital streaming platform does not necessarily work for vinyl. This long-loved medium comes with its own pitfalls and obstacles that must be recognized and taken into account in order to take full advantage of vinyl’s benefits. But the end result – an absolutely fantastic-sounding album in great-looking, full-size packaging – is totally worth it.